


HAPPY BIRTHDAY HAPPY BELLY :)
 My baby's 1! I've loved having this blog for the past year. I love forcing myself to keep up the commitment of updating regularly, I love having somewhere to share my food obsessions, and I love just having somewhere to rant about my days. And you know what? I love having something to be proud of. As scared as I am to admit it, I do see this as an achievement and I am proud of it.
I only really discovered my love for cooking in university. I had never been particularly good at anything before. I'm hopeless at sports, mediocre at art, and just good enough at academics. I had always loved food and cooked a bit here and there, but I never really properly discovered my passion until I came to university. I'm not saying I'm particularly good at cooking, in fact, I think with just a bit of passion and some research and experience, anybody can cook. However, I did improve. I came from cooking raw chicken served in orange juice in my first year in university, to making a 9-layer dobos torte! haha. Honestly, I've always been scared of being confident in anything, because I know that there's such a thin line between confidence and arrogance, and I'm terrified of crossing that line. Arrogance is simply obnoxious. Not only does it make that person irritating but it makes others feel bad about themselves, and there's no quality worse than that of being able to make someone feel that way. I suppose this fear has stopped me from being even secretly confident because I accuse myself of being arrogant whenever I have such thoughts.
It's funny because that's why, even after a year of Happy Belly, I'm still not confident in my cooking. I'm always so surprised when people say I'm a good cook simply based on my blog. Oh if they only knew how I'm able to photoshop photos to make them more delicious-looking hah. Cooking's just one of those things where I feel like..you can't screw up if you put your heart into it. Some are better than others, but I'm nowhere near the level of the people that are really good at it. But you know what, it's okay. What I've got, what I can cook for myself and others, makes me happy. It may not be fantastic, but I'm still proud of it. So, thank you, Happy Belly, for a year of therapy.
 I've thanked multiple people throughout the year, but one person I've talked too little of is my sister. My sister's always been supportive of me and this blog, and it's always nice to have someone to be proud of you. So thank you, this post is for you, couldn't have done it without you, Nanna <3
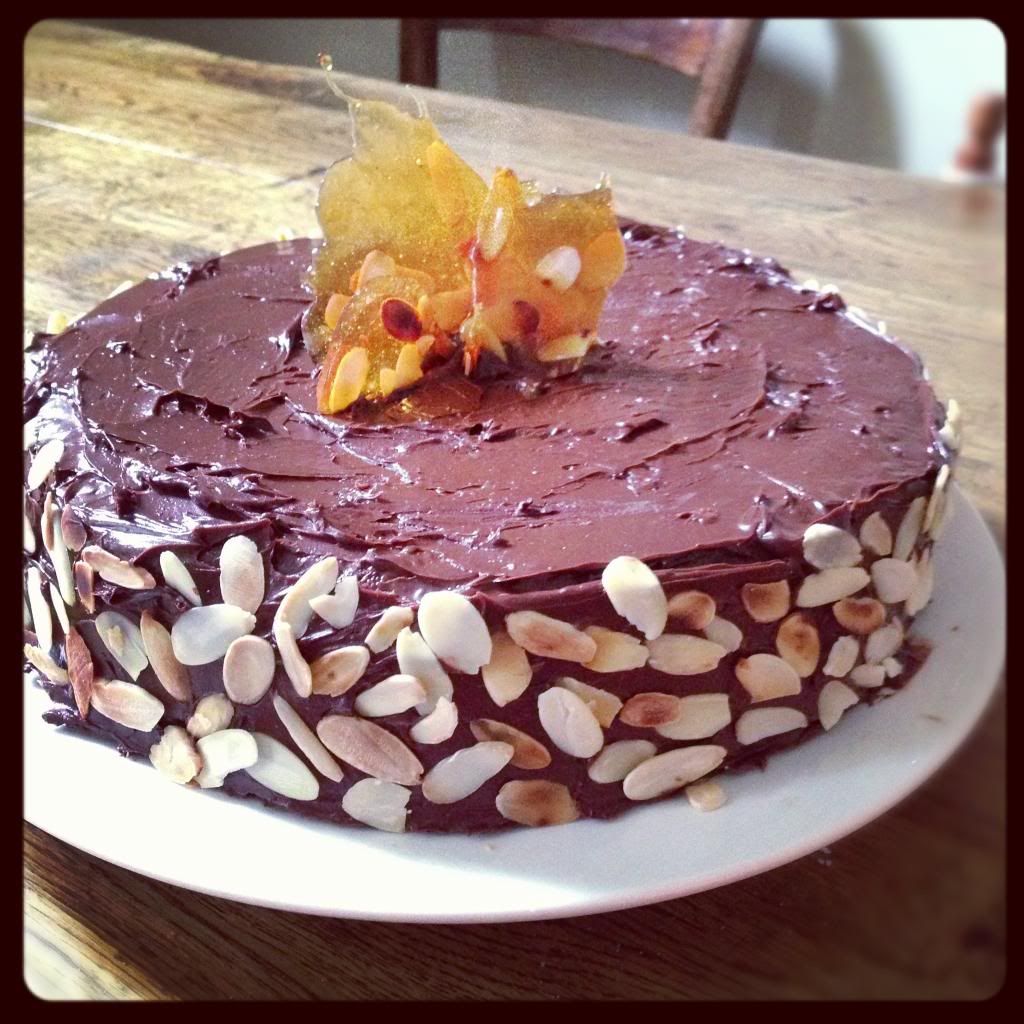
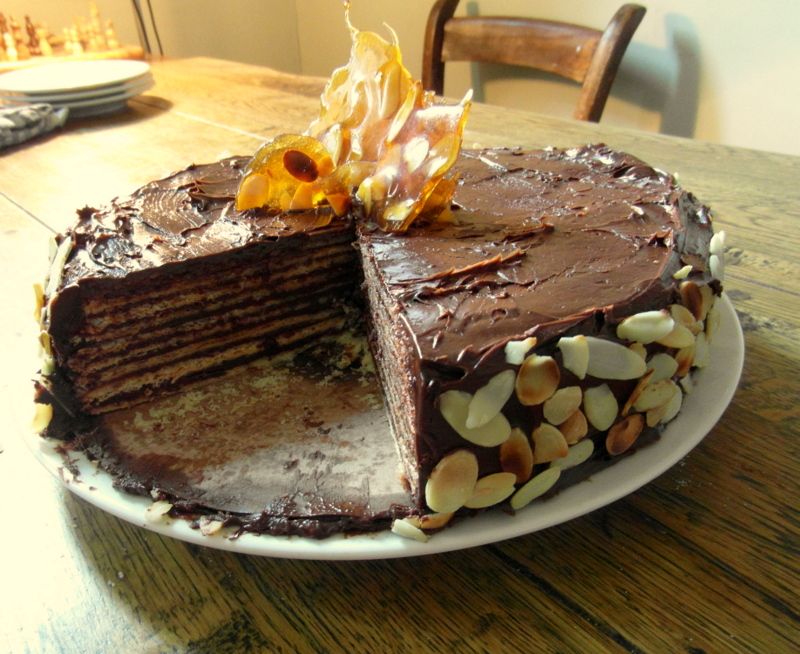
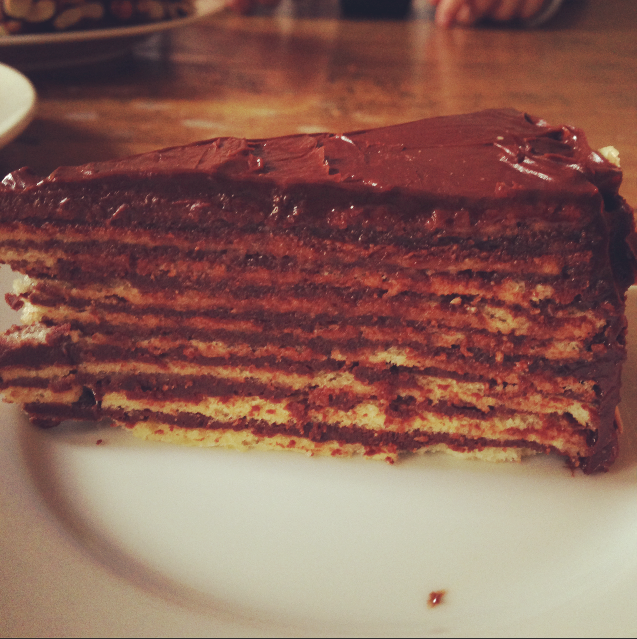
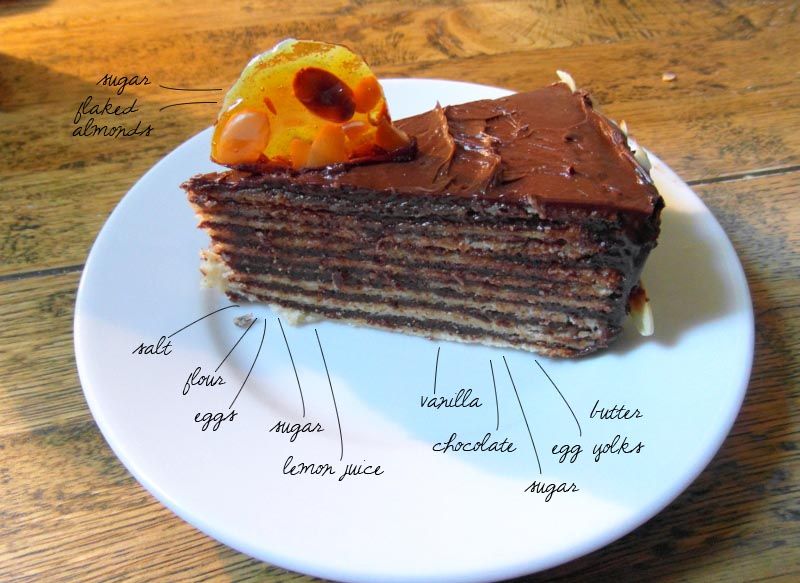 This is a multi-layered Hungarian cake. It's quite rich and dense, but quite delicious. It's something you have to do the day before when you've got a lot of time. It does take a whole afternoon, but it's worth it for a special occasion simply due to its appearance. Look at the number of layers! I had made 12 sponge layers but 3 had failed, so it became 9 layers. I was too ambitious. I was too stressed, I was worried it was all going to be a disaster. But fortunately it was alright :) I want to thank everyone that came to celebrate Happy Belly's birthday with me, thank you for your kind words about the cake, and thank you Paulina, Nick and Gen for the photos (aren't they beautiful?).
Head over here for step by step photos. They really help!
Ingredients
Sponge Cake
7 eggs, separated
3 egg yolks
1 pound (453g) icing sugar
4 oz (113g) plain flour, sifted
1 tbsp lemon juice
1/8 tsp salt
Chocolate Butter Cream
300g dark chocolate
300g butter
1 1/2 tsp vanilla extract
4 egg yolks
3 tbsp icing sugar
Decorations
1/2 cup caster sugar
1/2 cup almonds
Method
-Start by cutting 10 pieces of aluminum foil or parchment paper, each about 11 inches square. Using a cardboard cake circle, pan lid or plate that’s 9 inches across, draw circles in the middle of the squares.
-Flip the sheets over, grease the area of the circle plus about another half inch all the way around for safety. Lay the parchment pieces out and sift powdered sugar over them. Tilt the sheets to get the excess off, and set them aside.
-Set a rack in the center of your oven and preheat it to 450. Sift the flour and salt together. In the bowl, beat with an electric whisk the 10 egg yolks on high for a few minutes until they’re pale and lemon-colored.
-Reduce speed and gradually add the powdered sugar.
-Increase the speed to high again and beat for 5 minutes or until very thick.
-Reduce the speed to medium-low and gradually add the flour. Scrape the bowl, then once again
increase the speed to high and beat for 5 minutes more, scraping once or twice. I know that the mixture just looks very stiff at the moment. Don't worry, it's meant to look like that
-Stir in the lemon juice and remove the mixture to another bowl.
-In another bowl, whisk the seven whites with the salt to the stiff peak stage. Stir a few spoonfuls of the whites into the yolk mixture to lighten it, then fold in the rest of the whites. Don't fright if in the beginning it doesn't seem like the egg whites will lighten the yolk mixture. It will. Don't worry.
-To bake, place two or three spoonfuls of the batter on each sheet, spreading the batter very thin with an icing spatula or the back of a spoon. Slowly rotate the sheet with one hand as you spread, being careful not to leave any holes. Using the edge of the counter, slip the sheets onto a cookie sheet and bake 5 to 7 minutes (or longer) until the layers are golden brown with dark brown spots.
-Remove the finished layers from the oven and, holding the corners of the sheets, invert them onto a rack. Peel off the paper and immediately invert the layer onto another rack or towel that’s been dusted with powdered sugar (otherwise the tops of the finished layers will stick to the rack). The fully cooled layers can be stored in a stack, provided they’re separated by sheets of powdered sugar-dusted wax paper.
-Trim the edges of each one up with a pizza cutter, using your original form (a cake circle or plate) as a guide.
-For the filling/icing, chop the chocolate and melt it in the microwave using as many 10-second bursts of high heat as are needed (stir between each). Allow it to cool completely, though not to the point that it re-firms, obviously.
-Have the butter at room temperature and cut it into cubes
-Cream the butter with an electric whisk. Add the vanilla and egg yolks and beat well.
-Next add the sugar and the cooled chocolate and beat it all until thoroughly mixed (don’t forget to scrape!).
-To assemble, choose a cake platter or build the cake on a cardboard cake circle. If you’re using a platter, lay down thin strips of parchment paper in a box roughly 9 inches square. These will serve as your drop cloth. Put a layer down on the plate and spread on a very thin layer of filling. Add another layer, making sure it’s placed in line with the one under it. Add another layer of filling. Continue on in this way until you’ve used all the layers.
-Spread the last of the filling over the outside of the torte.
-Refrigerate the cake for at least a couple of hours
-To decorate, carefully put the almond slices around the cake, saving a few pieces for the praline later
-To make the praline: decoration in the middle just pour the sugar into a pan. Over medium-high heat, you can swirl the pan but do not stir the sugar. Do not. When it turns amber, add the almond slivers and pour onto a piece of parchment paper. Let cool then break into pieces and place in the middle of the cake
My baby's 1! I've loved having this blog for the past year. I love forcing myself to keep up the commitment of updating regularly, I love having somewhere to share my food obsessions, and I love just having somewhere to rant about my days. And you know what? I love having something to be proud of. As scared as I am to admit it, I do see this as an achievement and I am proud of it.I only really discovered my love for cooking in university. I had never been particularly good at anything before. I'm hopeless at sports, mediocre at art, and just good enough at academics. I had always loved food and cooked a bit here and there, but I never really properly discovered my passion until I came to university. I'm not saying I'm particularly good at cooking, in fact, I think with just a bit of passion and some research and experience, anybody can cook. However, I did improve. I came from cooking raw chicken served in orange juice in my first year in university, to making a 9-layer dobos torte! haha. Honestly, I've always been scared of being confident in anything, because I know that there's such a thin line between confidence and arrogance, and I'm terrified of crossing that line. Arrogance is simply obnoxious. Not only does it make that person irritating but it makes others feel bad about themselves, and there's no quality worse than that of being able to make someone feel that way. I suppose this fear has stopped me from being even secretly confident because I accuse myself of being arrogant whenever I have such thoughts.
It's funny because that's why, even after a year of Happy Belly, I'm still not confident in my cooking. I'm always so surprised when people say I'm a good cook simply based on my blog. Oh if they only knew how I'm able to photoshop photos to make them more delicious-looking hah. Cooking's just one of those things where I feel like..you can't screw up if you put your heart into it. Some are better than others, but I'm nowhere near the level of the people that are really good at it. But you know what, it's okay. What I've got, what I can cook for myself and others, makes me happy. It may not be fantastic, but I'm still proud of it. So, thank you, Happy Belly, for a year of therapy.
Head over here for step by step photos. They really help!
Ingredients
Sponge Cake
7 eggs, separated
3 egg yolks
1 pound (453g) icing sugar
4 oz (113g) plain flour, sifted
1 tbsp lemon juice
1/8 tsp salt
Chocolate Butter Cream
300g dark chocolate
300g butter
1 1/2 tsp vanilla extract
4 egg yolks
3 tbsp icing sugar
Decorations
1/2 cup caster sugar
1/2 cup almonds
Method
-Start by cutting 10 pieces of aluminum foil or parchment paper, each about 11 inches square. Using a cardboard cake circle, pan lid or plate that’s 9 inches across, draw circles in the middle of the squares.
-Flip the sheets over, grease the area of the circle plus about another half inch all the way around for safety. Lay the parchment pieces out and sift powdered sugar over them. Tilt the sheets to get the excess off, and set them aside.
-Set a rack in the center of your oven and preheat it to 450. Sift the flour and salt together. In the bowl, beat with an electric whisk the 10 egg yolks on high for a few minutes until they’re pale and lemon-colored.
-Reduce speed and gradually add the powdered sugar.
-Increase the speed to high again and beat for 5 minutes or until very thick.
-Reduce the speed to medium-low and gradually add the flour. Scrape the bowl, then once again
increase the speed to high and beat for 5 minutes more, scraping once or twice. I know that the mixture just looks very stiff at the moment. Don't worry, it's meant to look like that
-Stir in the lemon juice and remove the mixture to another bowl.
-In another bowl, whisk the seven whites with the salt to the stiff peak stage. Stir a few spoonfuls of the whites into the yolk mixture to lighten it, then fold in the rest of the whites. Don't fright if in the beginning it doesn't seem like the egg whites will lighten the yolk mixture. It will. Don't worry.
-To bake, place two or three spoonfuls of the batter on each sheet, spreading the batter very thin with an icing spatula or the back of a spoon. Slowly rotate the sheet with one hand as you spread, being careful not to leave any holes. Using the edge of the counter, slip the sheets onto a cookie sheet and bake 5 to 7 minutes (or longer) until the layers are golden brown with dark brown spots.
-Remove the finished layers from the oven and, holding the corners of the sheets, invert them onto a rack. Peel off the paper and immediately invert the layer onto another rack or towel that’s been dusted with powdered sugar (otherwise the tops of the finished layers will stick to the rack). The fully cooled layers can be stored in a stack, provided they’re separated by sheets of powdered sugar-dusted wax paper.
-Trim the edges of each one up with a pizza cutter, using your original form (a cake circle or plate) as a guide.
-For the filling/icing, chop the chocolate and melt it in the microwave using as many 10-second bursts of high heat as are needed (stir between each). Allow it to cool completely, though not to the point that it re-firms, obviously.
-Have the butter at room temperature and cut it into cubes
-Cream the butter with an electric whisk. Add the vanilla and egg yolks and beat well.
-Next add the sugar and the cooled chocolate and beat it all until thoroughly mixed (don’t forget to scrape!).
-To assemble, choose a cake platter or build the cake on a cardboard cake circle. If you’re using a platter, lay down thin strips of parchment paper in a box roughly 9 inches square. These will serve as your drop cloth. Put a layer down on the plate and spread on a very thin layer of filling. Add another layer, making sure it’s placed in line with the one under it. Add another layer of filling. Continue on in this way until you’ve used all the layers.
-Spread the last of the filling over the outside of the torte.
-Refrigerate the cake for at least a couple of hours
-To decorate, carefully put the almond slices around the cake, saving a few pieces for the praline later
-To make the praline: decoration in the middle just pour the sugar into a pan. Over medium-high heat, you can swirl the pan but do not stir the sugar. Do not. When it turns amber, add the almond slivers and pour onto a piece of parchment paper. Let cool then break into pieces and place in the middle of the cake


that looks so freaking good!
ReplyDeletehappy birthday happy belly!!!!!!!!!!!!!!!
ReplyDeleteThis looks absolutely scrumptious! Happy Birthday Happy Belly! x
ReplyDelete